Need Help?
A fun fact about strawberries is that they are the thickened parts of the stems, not the real fruits. The actual fruits are the yellow seeds present (known as achenes) on the surface of the berries.
There are multiple stories regarding how the name of the strawberry came to be. As per the most widely-accepted story, when the strawberries fell from trees, they would become strewn or untidily scattered. So, they came to be known as strew berries. Eventually, the name shifted to strawberries. As far as the place of origin of strawberries is concerned, France is said to be the first place for the cultivation of berries.
Now, let's discuss a little about the historical significance of strawberries. As per mythology, strawberries were loved by Romans. Additionally, the fruit became so enticing in medieval times that they were carved and added to church altars and cathedral pillars to symbolize perfection. The favoritism towards Strawberries increased during the 16th century, thanks to the discovery of their therapeutic qualities. The ancient Romans believed that these berries could provide relief in case of fevers, kidney stones, inflammations, throat infections, and many other diseases. Furthermore, wealthy women bathed with strawberry juice to maintain glowing skin.
There are many different ways of consuming strawberries including having them dried, in a drink, or as a jam, etc. Strawberries are used to prepare many mouth-watering recipes like strawberry cheesecakes, strawberry Amaranth cupcakes, phirni brulee, strawberry granita, chocolate strawberry sheet cake, etc. Not only that, these berries are used to make refreshing drinks such as strawberry shakes, strawberry lime smoothies, strawberry-melon squash, etc.
Strawberries have a huge role to play in art. Their bright red color provides a quality contrast against a dark background. This makes the art piece more appealing to the audience.
Adriaen Coorte is a well-known name for depicting fruits and vegetables beautifully in paintings. In one of his still-life paintings, Adriaen depicted juicy strawberries on a ledge against a dark background resulting in overall good contrast. Click here to view more of his artworks.
Another masterpiece was designed by Lucian Freud. He has included the most minute details of the berries in his art like their seeds, color, skin texture, etc. After its completion, Lucian gifted this art piece to his fast friend, Ann Rothermere. To view the above-mentioned paintings and even more strawberry artworks, click here.
Through this blog post, we are going to tap into our creative selves and learn how to draw a strawberry in 6 easy steps.
To help you thoroughly, we have included a step by step video guide as well! Click here to watch the video.
Before we begin, make sure that you gather the following objects:
1) Drawing Paper
2) Pencil
3) Eraser
4) Black or a dark-colored marker / pen
5) Crayons or pencil colors
Now, without any further ado, let's begin!
To make our strawberry drawing simple and symmetrical, let’s draw one-half of the berry at a time. So, our first step will be to draw a curve that resembles one-half of a heart.
Now, all we need to do is mirror the first half of the strawberry. To do this, start drawing the curve from the bottom of the first curve. Once done, we will get a shape that resembles a heart without any top.
We are done with the lower body of the strawberry. Now, let’s add a crown of leaves over the head of our little friend. For this, we will be using the space present above our shape. All we need to do is to draw two lines that extend to the left and right of the shape’s top. Finally, draw a thin and long stem protruding from the top of the leaves. Now, let’s proceed to step 4 of our strawberry pencil sketch.
In the previous step, we designed the outer structure of the leaves in our strawberry drawing. Now, it’s time to add more details. To achieve this, let’s draw numerous sharp and curved lines that extend down into the interior of our strawberry’s shape.
Make sure to draw the leaves in such a way that all of the empty spaces are filled properly. If you have any confusion, refer to the above illustration.
We have successfully designed the entire body of the strawberry. However, the texture of the berry is yet to be added to our strawberry sketch. If you bring a strawberry and observe it closely, you will find it covered in multiple little black seeds. To make our strawberry drawing realistic, let’s include them in our art.
To achieve this, draw numerous vertical dashes in a curved fashion. To gain more clarity, observe the above image.
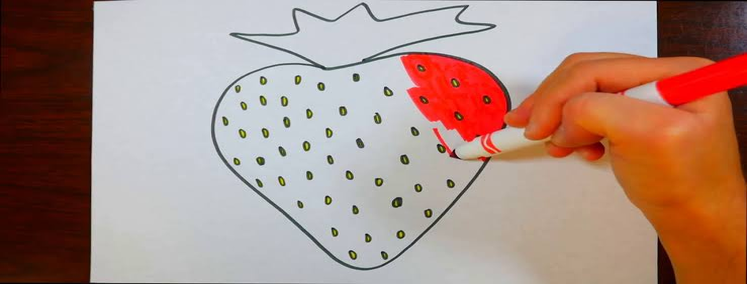
Our strawberry drawing is not going to be complete without colors. So, let’s pick up our colors and make our art more beautiful with their magic.
A strawberry has a red body with green leaves. But this is not the only realistic color combination we can work with. For instance, along with red, we can use several colors like brown, yellow, and green to showcase the different stages of the berry’s ripening.
Furthermore, we can use different coloring materials to add different effects to the drawing. To add vibrant and bright effects, we can use colored pens and acrylic paints. However, to keep it plain and simple, crayons and watercolors are great choices.
Finally, our strawberry drawing is complete. Congratulations! We hope you enjoyed this tutorial and learned a lot through it. For more fun learning, be sure to check out our other tutorials.
Do your kids love to express their imagination through colors?
If so, TalentGum is here to bring out the hidden painter within them.
Make your kids the champions of colors through our specialized online Art and Craft classes where kids learn the fundamentals of Art and eventually move towards creating beautiful artworks inspired by legendary artists like Vincent Van Gogh and Pablo Picasso.
Always remember: Your child's satisfaction is our motivation. That's why our team has chosen the best faculty and included the most fun and practical art concepts in our sessions.
So, what are you waiting for? Let's begin a colorful journey full of excitement and learning.
Book a free demo- HERE
We will send you a confirmation code
 + 91
+ 91
We will send you a confirmation code
Have trouble signing in? Use Email Address instead.
Don't have an account? Click here to sign up.
Please enter the OTP sent to
<%cust_input_country_code%><%cust_input_value%> ![]()
Almost there: enter your details and select your preferred time


